Showing posts with label clothing. Show all posts

Thursday, November 15, 2012

Pinterest Challenge Week #1

Don't know about the Pinterest Challenge? Read this post first.

Okay, I know I'm a little late here. I'm not behind in my projects, just behind in posting them here. It's been really fun doing this. It's just hard to find the time to blog about it. :)
Here is week one:
11/1/12
Inspiration:
 
My Results:
 
This seriously took me less than 5 minutes to do. I realized I really had a lot more in this cupboard than I truly use, so many items got pulled out and are in the charity box in the garage.  I already had the pan rack from the first time I thought about attempting this. (It just sat on the shelf, unused.) I have more pots than skillets and some really large cookie sheets and pizza pans, so the set-up in the picture didn't quite work for me. I tweaked it to work for my stuff for now, but I think it will work.(I have a few more cookie sheets in the dishwasher.) I may move some of the larger things to a different place later on. Doing this allowed me room in the other side of the cupboard for the second pin of the day...
Inspiration: 
 
My Results:
 
I had already done a little prep work earlier in the week. I bought a new set of storage containers at Wal-mart. (They were the same as the ones I have.) They had different colored lids, so I made sure that each size container has a different colored lid. That should make it easier to keep sorted and to match up when we need a container. I didn't see any dish racks (like in the inspiration photo) that I liked or were particularly big enough, so I bought a few dish pans (buckets) the size I needed and a three pack of little storage trays to keep things separate inside. This was also a quick fix, maybe 30 minutes. Most of the time was spent sorting through my old containers. 
 
11/2/12

Inspiration:
100 Toddler Shots to Improve Your Family Photography
(source)
Click through to see the 100 inspiration pictures. I know these are for toddlers but I thought some of these pictures would be great with my preschooler (age 3) as well.
My Results:
(Yes, she has a lollipop. Halloween candy bribery for a photo shoot.)
It was slightly overcast, cool and even a little foggy this morning, so I thought it would be perfect to get some pictures at the park. By the time I had gotten big kids on the school bus, fed the baby, double checked my inspiration, and found everyone shoes, the weather had changed. It was bright and sunny and at least 15 degrees warmer, but we trekked down to the park anyway. First off, let me just say the sun was against me. I could not believe how stinking bright out it was at 9:30am. Secondly, it is hard to take pictures when you have a baby strapped in a carrier on your chest. Just saying....
Here are a few of my favorites:


I tried taking some pictures of Bekah, but she wouldn't have it. Here's why...
(sleeping)
Did it improve my photography? I don't know, but it definitely got me thinking outside the box. And it was fun to take a ton of photos.
 
 
11/3/12
This day was a super busy day, a Super Saturday in fact. Our women's group at church (Relief Society) was having a fun all-day crafting/learning/visiting activity called Super Saturday. We had lots of different crafts and projects that we could sign up for, demonstrations we could watch, food to eat, a service project to help out with, and/or just sit and visit with our friends. I love Super Saturdays. However, I knew I would be busy because I was going to be teaching a class on glass etching for casserole dishes/glass pans. The funny thing is that I had never done this before but my friend in charge (knowing me to be a crafty person) asked if I could figure it out and then teach it to everyone. Um, yeah. Technically, I practiced quite a bit before teaching it, but I turned to Pinterest to teach me and gather ideas, plus I actually etched one of my pans on this day, so I'm saying it counts.
 
Inspiration:
 
One of My Results:
This one says, "{Yummy}." I also made one with my last name, one that says "This pan does not belong to you," and one that says, "Oh no! It's all gone!" I really liked doing this and it wasn't too hard. If you do this make sure you use glass cleaner to get fingerprints of the glass before applying the etching cream. Also, some Pyrex don't etch well. We found that it's a gamble. Some would etch in 5 minutes. Others would take 20 to 30 minutes and still others wouldn't etch at all. The one time I'm thankful I didn't buy the name brand. All of my cheap pans etched very easily.
 
11/4/12
Inspiration:
 
My Results:
 
 
I really wanted some cute bows for church and remembered pinning these. There isn't a tutorial with this pin (since they are on Etsy) but I loved the idea and pretty much knew how to make them. They were actually pretty quick. I made 3 before getting ready for church. I LOVE them! Both of my daughters wore them and I contemplated wearing one too but my husband nixed the idea. Something about overkill. I see many more of these in my future. Many more for the baby, a few for Bee, and maybe some on hair clips for me...
 
11/5/12
Inspiration:
 
My Results:
 
I used two different sized washers because I wanted a little different lay out. Instead of using jump rings on the large washers, I used eye pins that looped through and I twisted around. Yes, I know very technical. I was afraid that my yellow nail polish wouldn't look yellow. So I did 2 coats of white nail polish before putting on the yellow.
 
11/6/12
Inspiration:
 
My Results:

Technically, I started this project back on Saturday. It was one of the classes being taught, but I never had enough time to work on it during the Super Saturday activity or after. So, I had to find some time to make it later. Thankfully, I had the instructions pinned on Pinterest. My turned out really long. I'm not sure if I cut my spirals too thin or I stretched it too much (probably both). Either way, I like it. I was actually afraid it was going to be too short, because the example that I saw seemed too short to
 
11/7/12
Inspiration:
 
 
My Results:
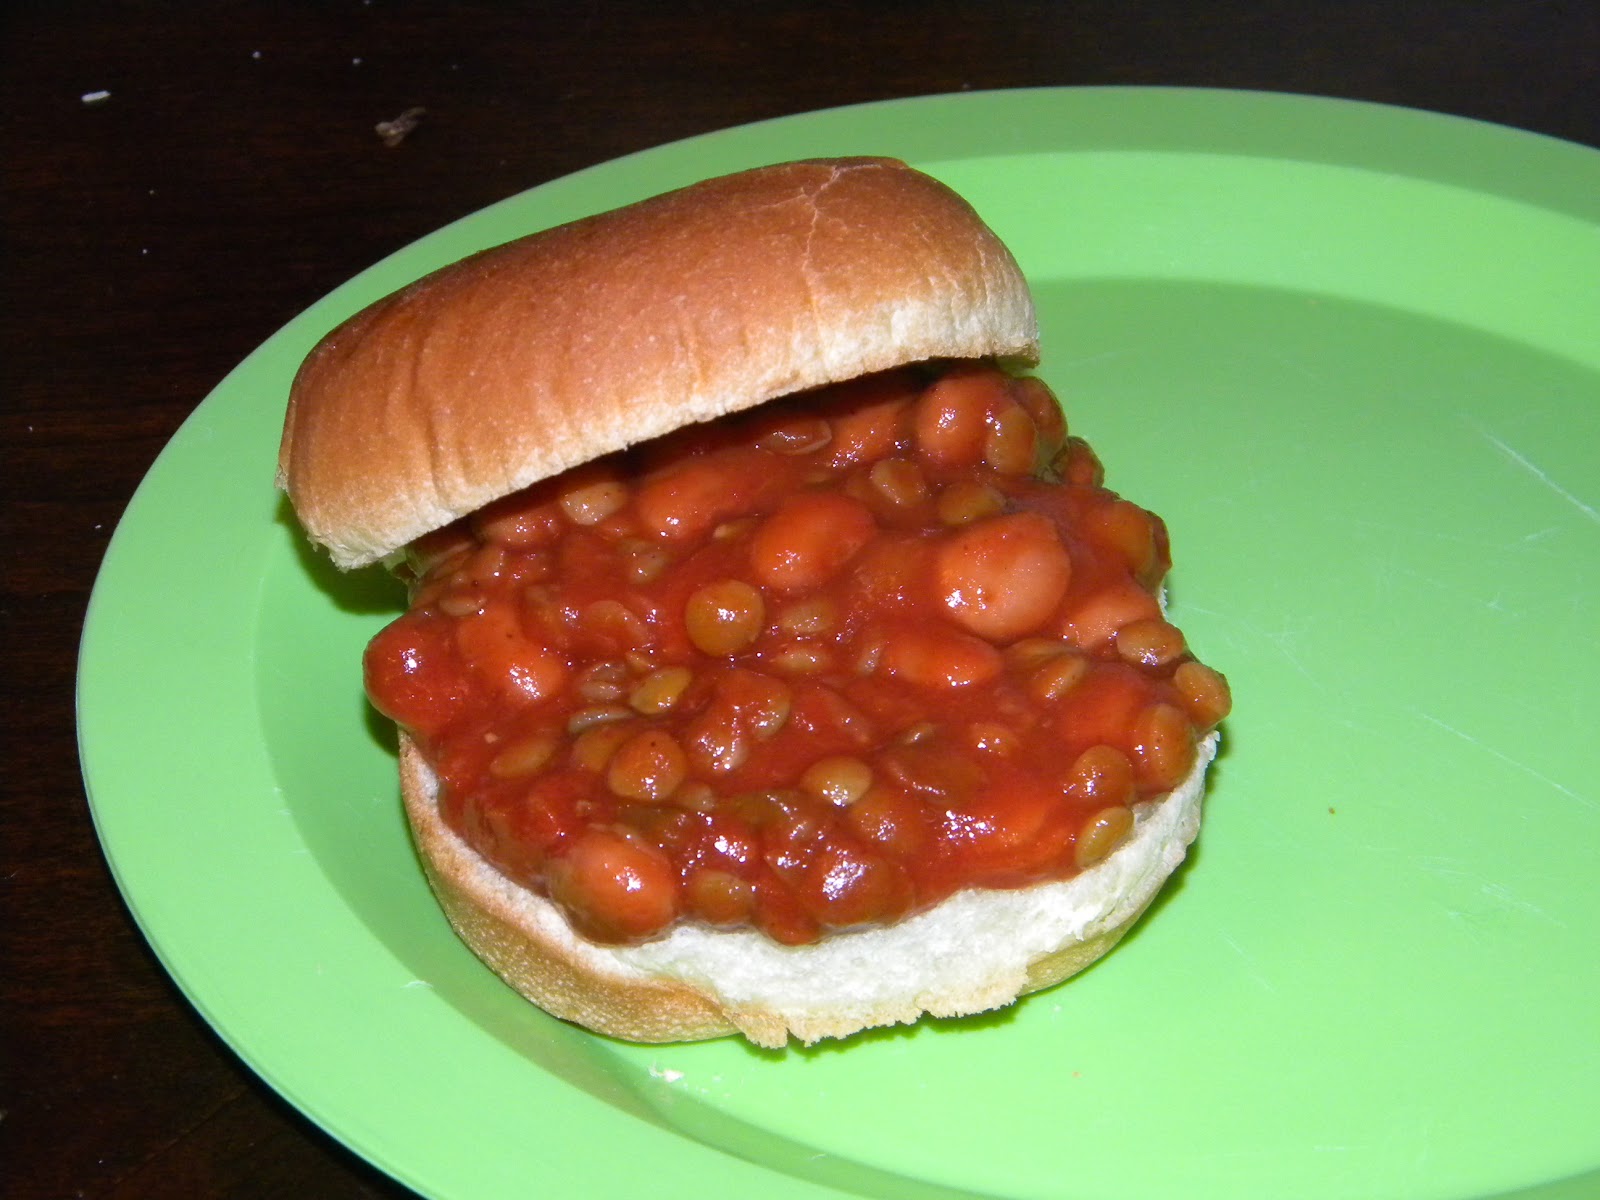
 
We had Cub Scouts and I needed a quick dinner, so I turned to Pinterest. (Okay, I actually already had this one planned out.) I combined the two ideas to make a meatless sloppy joe sandwich. We called them Beany Joes. I thought it tasted pretty good. I liked the beans better than the lentils though.
 
Check back soon for a recap of Week 2!

Wednesday, October 20, 2010

Little Black Dress

So a couple of week’s ago my friend Elizabeth and I had a girl’s night out. She had season tickets to the Houston Ballet and invited me to join her. Not even thinking about what I should wear, I asked her the morning of, what the dress standard was for the ballet. (I’ve only ever been to college performances, nothing official.) She described what she was going to wear and I responded “so Sunday dress,” to which she replied, “at least.” She then described how she had even seen people wearing ball gowns and tuxedos, and continued to explain how this is one of the few times she gets to really dress up, so she likes to go all out. I mulled the thought over in my head all day as I tried on a number of my Sunday outfits and nothing felt dressy enough. I quickly remembered a beautiful red  formal dress, I had seen at Goodwill the week before. For $10 it would be worth the trip, so 2 hours before I needed to pick up the babysitter, I loaded up the kids and we went to Goodwill. Sadly, it was gone. Instead, I found this beautiful but sad black floor length formal.From the camera 009 (Sorry for the bad picture. I was in a hurry and the mirror was dirty.)
It fit pretty well and I loved the sweetheart neckline, but it was WAY too long. I felt like I should be playing a piano concert or something. I think I even played out the motions in the mirror. (No offense to you lovely pianists.) I had to carry it just to walk and that was with heels on! So, inspired by New Dress A Day, I chopped off the bottom and hemmed it.  If you look closely my hem is not entirely straight but the fullness of the skirt hides it.
DSCN2854 I love the 50’s feeling of the shorter dress. It looks much happier now. For a little something extra, I added the turquoise sash from this outfit. I felt much better about this outfit than anything I had on hand, and while it was not entirely necessary (not everyone at the ballet was dressy), it was fun to feel fancy and pretty on a fun Girl’s Night Out!
DSCN2849
(Sorry, for the bad lighting picture. It was late and everyone was asleep when I thought to take a picture of the final outfit.)
Linked to:

Monday, October 18, 2010

Old Halloween Costumes


The Dating Divas are having a Halloween costume contest (here). Unfortunately, our costumes for this year are still being made and the contest closes today. So, I dug through some computer files and found these beauties, the year we were the Teenage Mutant Ninja Turtles.
Yes, I made these costumes. I always make our costumes. It's part of the fun for me. Seth's turtle shell was actually a hand-me-down from another family and I used it as a guide for the others. Don't you just love the toilet paper tube numchucks. Love these costumes. These costumes are famous in our neighborhood. "Oh yeah, you're the family that dressed up as ninja turtles." Yeah, we get that alot. Apparently our neighbors look forward to seeing our family's costumes every year. We've always dressed up as a family. It's more fun that way. Plus, sometimes it's easier for people to guess your costume in the context of the group. I'll keep digging and see if I can find old photos.

I have loved our costumes over the years. When the hubs and I were engaged, we dressed up as conjoined twins. I sewed two sweatshirts together and we were literally "joined at the hip." Then our first Halloween, the hubs had to work but at 8 months pregnant, I dressed up as a snowman. Then Bean's first Halloween,  Bean was curious George, I was another monkey, and the hubs was the man in the yellow hat. The next year, I was pregnant again. We dressed up as Mr. and Mrs. Potatohead and Bean was a "Tater Tot." Then Monkey's first Halloween, we did the Wizard of Oz. I was Dorothy, the hubs was the tin man, Bean was the scarecrow, and Monkey was the lion. The next year, we were all super heroes from the book Super Hero ABC (the boys favorite at the time). Then came the Ninja Turtles. Last year was Bee's first Halloween. Aaron was a pirate captain and the rest of us were his "skeleton crew." (A play on words, yes, we were skeletons). I'm really excited about this year's costumes. Let's just say, we are going "old-school."  Stay tuned for the big reveal...

Thursday, May 20, 2010

T-shirt transformed to Pleated Dress

I LOVE this dress from Make it and Love it! (Her daughter is adorable in all her pics.) What's funny is that the last couple of week's I've been trying to dream up a way of turning an old t-shirt into a cute dress and I just stumble upon this idea. That's the great thing about craft blogs from crafty people everywhere, all of these wonderful ideas floating around in cyberspace just waiting for me to find, and they've already figured out the hard part (the how-to)! Once I get my sewing machine up and running again, I'll definitely do this for Aubrey. Hmmmm...if all goes well, I might even try it for myself...

Wednesday, May 12, 2010

Loving Skirt Week

I am totally loving "Skirt Week" at Simply Modern Mom, a week full of repurposed skirts. This one is called the "Knot-Me Tie Skirt." I want to make this one for Aubrey. First, I just need to figure out the zig-zag stitch on my ancient sewing machine. :)

Saturday, May 8, 2010

Yet another great repurposed dress...

I love shirts repurposed into dresses. I have yet to make one but it definitely has my brain going! I love the braided straps on this one from Makeit-loveit.com. Check out her easy tutorial.

Friday, May 7, 2010

Another great dress


Another great dress from Simply Modern Mom. This one is upcycled from a Men's dress shirt. Check out her pictures and tutorial. I definitely want to try this one.

Ruffled Pillowcase Dress


I am totally loving this dress! Check out the pic and tutorial from Simply Modern Mom. This is one of those projects that I stumble upon and go "Oh! I want to do that! Oh! I have the stuff right now to do it! Yeah! I'll start right now!" I so love this dress and I am going to make one for my little dear. I already have two vintage pillowcases that I am ready to transform. I will post pics as soon as they are done. Wish me luck...

Wednesday, January 6, 2010

The Incredible Stamped Shirt


Another one of those "I want to make this now" ideas. I saw this idea on Make and Takes website one night and thought "What a great idea, and I even have the stuff I could make it right now!" 
Well, that was 11pm and since I hadn't had a full night's sleep in awhile, I figured I'd make it later (i.e. the next morning). I immediately dug through my rubber and acrylic stamps to see what I could work with. Here are my finished products. It's just a repeated pattern stamped in acrylic paint. This first was a red ladybug on my daughter's onesie. The second was just a cluster of two flower stamps around the word (letter stamps). This is my favorite. I think smaller stamps look better than big ones.


The last was a multi-sided stamp done in four different colors. My son helped stamp this one and decided he wanted to wear it before we could do the back. We washed it (instead of heat setting it first) and it gave it a kind of vintage look. Check out Make and Take's tutorial for the how-to. It's great because you can take an old shirt and disguise the stains among the stamps!

Linked to:

Friday, November 20, 2009

Baby Legs and Arm Warmers


Now that it is starting to get colder I have found that my baby girl is short on cool weather clothes, especially pants. I love the baby legs idea, but it seems expensive for just one pair (a pair of pants would be cheaper). As this problem has arised, I have seen lots of different homemade versions of these and have been so tempted to try these. I saw this post on "Little Birdie Secrets." These instructions are the simplest version I've found. The hard part has been finding knee-high/thigh-high socks that I like that I could use. Somewhere I found instructions for frilly baby legs. Basically the same, but you stretch the edge as you serge or zig-zag sew the hem.